DS Inventory - Manual


Requirements

In order to install the program on your own server, you need these things installed.
  1. PHP 7 and MariaDB (MySQL)
  2. Linux Webserver
  3. Debugging in php-turned off
  4. IonCube-support
  5. cURL-support
In most cases, this program can run on shared hosting platform. If you need hosting with service agreement, contact us and we can maintain the install and update it for you.

Back To Top

Installing

Program is installed with a few easy steps. Download the zip to your local computer and upload all files to your webhost. Create a new database and user using cPanel, DirectAdmin or manually on a platform of your choice. Keep this information at hand during install.

Steps to install

  1. Navigate to yourdomain.com/mng/install.php.
  2. Accept terms and conditions by clicking Next.
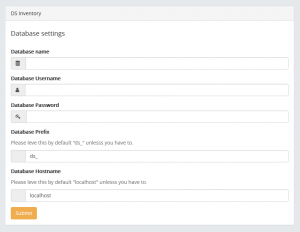
  3. State DB-user/password and DB-hostname, click Next.
  4. If all is OK, click Next and you will be done.
These are two main screens you will see during install - only the important stuff is shown:   
 
If you receive any error-messages during this process, please contact support and do a screenshot. Admin-area will be at https://yourdomain.com/mng/ and default user/pass is "admin".

After login

We recommend you to create locations, categories, type of equipment (laptop, server, ipad etc) and a few tags before you add stuff. This is because it will pre filled values that is useful.  

Back To Top

Creating Categories

The software should be fairly easy to use. The first time you log in, we suggest that you first create a category. A category can be whatever you want it to be, but for our example, we plan to have Desktop, Laptop and different categories like that.

Creating our first category

  1. Click Categories in the left menu as shown on illustration below (1) - a form showing all your categories (if any) in a list to the right.
  2. Click the button Create new.
  3. Type the name of the new category and push Submit - you will get a confirmation.
  4. Done.
 
Creating inventory, brands, locations, IP-address, people, tags etc. will follow the same path just described. Menu is always to the left and you always add a new inventory, category, brand etc. by pushing the Create new that is to the top right of the list everywhere. Easy? Yes, we hope so!

Introduction to tabs

Just to start easy, I will show you how tabs works. In this example, I just click pencil beside your category - just beside the red trash-can symbol. If you click on the tab named "Page 2", shown with the red number 1 in the picture below, you will get a lot of options in most screens. In this one, you just type in a font-awesome name and it will display a nice icon on the first page after you login. Just something to think about.


Back To Top

Creating inventory

Creating Inventory

  1. Click the menu item Inventory to the left (indicated by red number 1 below).
  2. Click + Create new, indicated by the red number 2.
     
     
  3. Now you are in a very powerful place! Please note that you have 5 pages on forms that you can optional fill out. Nothing is mandatory. If you have tags, just start typing the pre-setup tags you have added in advance. Tags needs to be already added before you can choose them.In Page 2, Page 3 etc, you choose brand and other useful information.


Back To Top

Extra Fields

You can add unlimited so called Pages and Fields throughout our Inventory Manager application. The way we have programmed it, it is very database friendly so that you will not get a slow database after adding many fields. Please note that you do need to be careful when using this function, as it works directly against your database. This is because we want it user friendly and fast. For the more technical people: Pages = Table in the mysql-terminology. Fields = Columns. You can add both from our application, but in this section we only deal with the Fields/Columns.

Customize a list - like the main Inventory

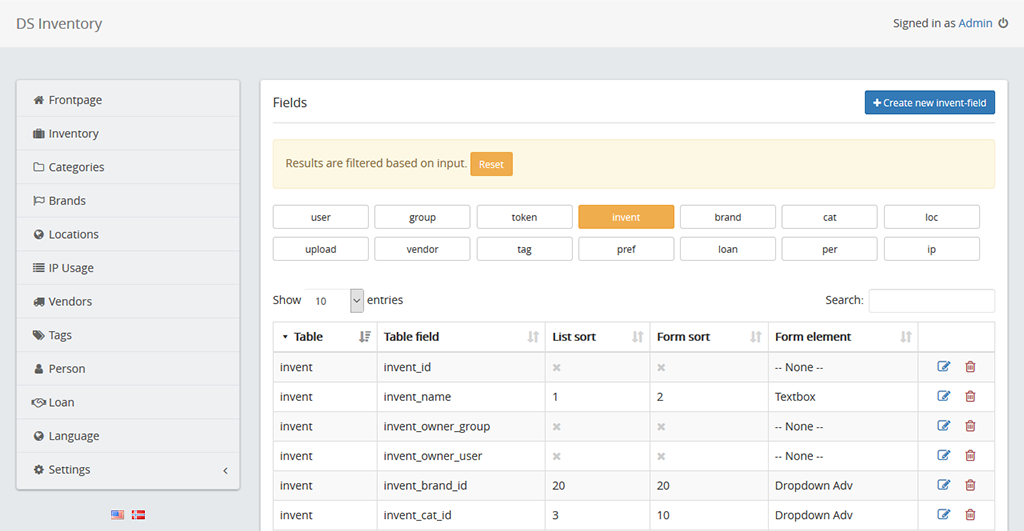
  1. Click Settings and then Fields - so you will get the opening screen similar to the screenshot below.
  2. Let us say you want to hide the Brand field from showing up in your main list - just click the orange "invent"-button to filter the fields on only the inventory-table. Now click the pencil-symbol beside invent_brand_id and remove the "List sort"-number in the form.
  3. Click Submit.
  4. Now, the Brand-information will not be shown in the list on the front-page. It will still be there, just not in the list.
 

Adding a completely new field to Inventory-list

Say you want to add a...

Back To Top